How to Choose Hand Rails for Steps?
Choosing hand rails for steps is a practical safety decision, not just a style choice. A rail should feel secure, offer a comfortable grip, and suit the people who use the steps every day. Small details matter. A smooth metal surface may look durable, yet feel slippery with wet hands. A thick wooden rail can feel warm, but may be difficult for someone with a smaller grip to hold.
Begin by looking at the steps themselves. Note their height, width, material, and exposure to rain or snow. Then consider who will use them: children, older adults, guests, or someone carrying groceries. These details affect the best rail height, shape, placement, and finish. Measurements should be checked carefully, and the installation should attach to a stable structure rather than loose trim. For complex stairs or uncertain mounting points, guidance from a qualified installer can help prevent avoidable problems.
Compare hand rails for steps by more than appearance. Check the grip, surface, strength, maintenance needs, and compatibility with the stair layout. Requirements can vary by location, so confirm applicable building guidance before buying or installing a rail. A product description alone may not answer every question. That is easy to overlook. A rail can meet expectations on paper but still feel awkward when used on a narrow landing or in poor lighting. Take time to imagine the daily routine, test samples when possible, and reassess the choice before installation. The right option is the one that feels dependable in real conditions, not merely attractive in a catalog.

Assess the Stairway Layout and Users’ Needs
Walk the stairway at a normal pace and note where people naturally reach for support. Count the steps, check the rise and width, and mark any turns, landings, or narrow sections. A straight flight may need one continuous rail; a turn can require a secure return or a second section. Small details matter.
Think about who uses the stairs every day. A child may need a lower grip point, while an older adult may benefit from a firm, easy-to-grasp rail with no sharp edges. If someone uses a cane or carries laundry, keep the walking path clear and avoid bulky brackets. Ask users to try a sample grip height, if possible. That changes everything.
Check what the rail can attach to, too. Plaster alone may not provide dependable support; locate studs or suitable masonry anchors before planning the installation. Measure the usable hand space beside the wall, including around doorways and switches. I have seen careful measurements miss a light switch by an inch. Recheck the layout, then compare it with local building requirements or ask a qualified installer when the structure is uncertain. Do not guess.
Compare Handrail Materials, Shapes, and Finishes
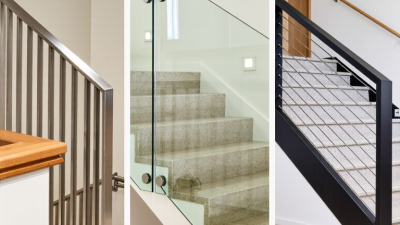
Material choice affects grip, upkeep, and comfort in cold weather. Stainless steel handles frequent use and cleans easily, though it can feel chilly outdoors. Aluminum is lighter and resists corrosion, but a thin rail may flex or dent. Wood feels warmer in the hand and suits traditional interiors. It needs periodic sealing, especially near wet entryways. Avoid glossy coatings where hands may be damp. Small detail, big difference.
Shape matters just as much. A round rail is easy to grasp from different angles, while a flat profile may suit a clean, modern staircase. Try holding a sample before deciding; a rail that looks elegant can feel awkward in a small hand. Check that the diameter and clearance work for the people using the steps, and confirm applicable local requirements. Brushed finishes tend to show fewer fingerprints than polished ones. Powder-coated surfaces offer color options, but chips can expose the material beneath. A contrasting color can make the rail easier to spot against pale walls. It is tempting to choose by appearance alone, but daily comfort is harder to judge from a catalog.
Choose Suitable Height, Grip, and Clearance
Set the rail height by measuring vertically from the front edge, or nosing, of each step. A common reference is 34 to 38 inches, but local requirements can differ. Keep the rail at a steady height as it follows the stairs. A sloping rail that rises and dips can feel awkward under a moving hand.
Grip matters. Choose a shape that fingers can curl around without strain; a broad, flat board may be harder to hold than a rounded or gently contoured rail. Test it with the hand that will use it most. A small mock-up helps. Gloves can change the feel, too, so leave room for a secure grip without making the rail bulky.
Leave clear space between the rail and the wall so knuckles do not scrape. About 1½ inches is a useful reference in many settings, but verify the applicable local specifications before installation. Check the ends as well: brackets, trim, and nearby door frames should not interrupt the hand’s path. It is easy to focus on measurements and miss a sharp corner. Walk the stairs slowly, both up and down, and notice where your hand naturally reaches.
Check Building Codes and Installation Requirements
How to Choose Hand Rails for Steps?
Before choosing a handrail, check the current building code and local inspection requirements. Rules can differ by location, building type, and whether the stairs are indoors or outdoors. A stair inside a home may face different requirements from a shared or public stairway. Small detail, big consequence.
Confirm when a rail is required, its permitted height, and whether it must run continuously along the stairs. Many codes measure rail height from the stair nosings, but the exact range varies. Check required clearance from walls, grip dimensions, rail extensions, and whether open sides also need guards. Do not assume one measurement fits every project. Measure twice.
Installation matters as much as the rail itself. Fasteners should connect securely to framing or suitable masonry, not just drywall or a thin trim board. Check that brackets leave enough room for a hand to grip the rail, and that ends will not catch clothing. Outdoor steps may need corrosion-resistant hardware and a stable footing. Instructions for the rail and fasteners can affect placement, too.
Before drilling, compare your measurements with the local authority’s guidance and any permit or inspection conditions. If the stair layout is unusual, ask a qualified building professional to review the plan. It is easy to focus on appearance and overlook a bracket near a turn; I would check that spot again before calling the job finished.
How to Choose Handrails for Steps
Check building codes and installation requirements before selecting a handrail. The chart shows selected measurements from the 2021 International Residential Code (IRC), in inches.
Key points: The IRC specifies a handrail height of 34–38 inches, at least 1.5 inches of clearance from the wall, and a 12-inch minimum horizontal extension beyond the top riser. Requirements and exceptions can vary by building type and local amendments, so confirm the rules with your local building department.
Weigh Maintenance Needs, Durability, and Cost
Choosing a handrail for steps means looking beyond its purchase price.
Wood feels warm and can be cut to fit, but exposed end grain and damp joints may need frequent sealing. Painted steel is sturdy, though chipped paint can let rust develop, especially near wet soil or salty air. Aluminum is lighter and often needs less routine coating, but its finish and fixing points still deserve inspection. No material is maintenance-free.
Think about the years of cleaning, repairs, and replacement. A simple rail with accessible brackets is easier to check than one with hidden joints. Small details count. Run a hand along the grip: water-trapping seams and rough edges can make everyday use less comfortable.
Compare the rail, fasteners, installation, and likely upkeep as one cost, not separate numbers. A cheaper option may need earlier repainting or repair. Not always. Conditions matter: a sheltered porch differs from steps exposed to rain and winter grit. Check that the rail can be securely attached to the step structure, and follow applicable local building requirements. If the surface is slick or the fixings loosen, the expected savings may not feel worth it.